To create a profile, complete the following steps:
-
Click the New button to display the details pane.
-
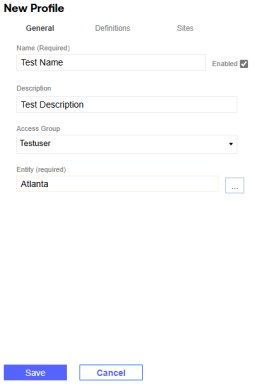
In the General tab, enter profile properties.
-
Enter a profile Name and Description. A Description is not required.
-
The Enabled checkbox is selected by default. To disable the profile, clear the Enabled checkbox.
NOTE: Disabled profiles with statuses of Not Started, In Process, and Submitted do not display on the Home page. Disabled profiles with a Completed status will still display on the Home page.
-
From the Access Group drop-down menu, select an access group for the profile. See Access .
-
Assign an Entity to the profile.
-
Click the ellipses. In the Select Member window, under the Hierarchy tab, use the tree navigation to select an entity. Alternatively, use the Search tab to search for an entity. Click the OK button.
NOTE: You cannot select multiple entities. A profile must be made for each entity used.
-
-
Click the Save button.

-
-
In the Definitions tab, assign definitions to the profile.
NOTE: You cannot add definitions if you have not saved the profile.
-
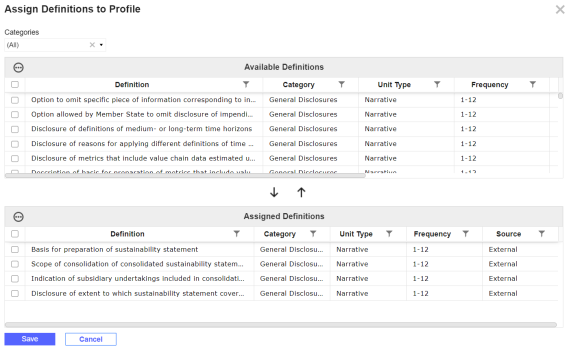
Click the Edit button to display the Assign Definitions to Profile slide-out.
-
To filter definitions, from the Categories filter, select a category from the drop-down menu. This filter defaults to (All).
-
In the Available Definitions grid, use the checkboxes to select definitions to add to the profile.
-
Click the Add button. The definitions will display in the Assigned Definitions grid. To remove definitions from the profile, in the Available Definitions grid, use the checkboxes to select definitions and then click the Remove button.
-
Click the Save button. The assigned definitions will display in the Definitions tab.

NOTE: Definitions display in profiles based on their assigned frequency. See Definitions.
-
-
In the Sites tab, assign sites to the profile.
-
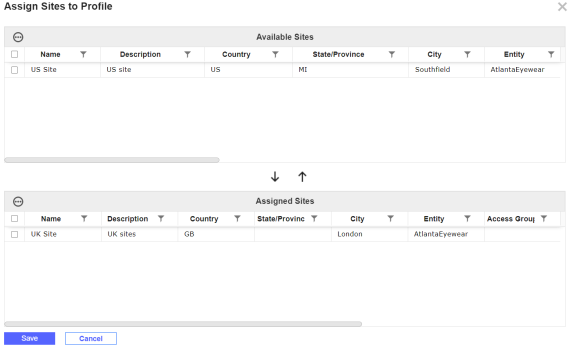
Click the Edit button to display the Assign Sites to Profile slide-out.
-
In the Available Sites grid, use the checkboxes to select sites to add to the profile. This table only lists sites under the entity selected for the profile.
-
Click the Add button. The sites will display in the Assigned Sites grid. To remove sites from the profile, in the Available Sites grid, use the checkboxes to select sites and then click the Remove button.

-
Click the Save button. The assigned sites will display in the Sites tab.
-
-
Click the Save button. The profile will display in the grid.
Copy Profiles
-
Select the profile you want to copy from the grid.
-
Click the Copy button.
-
Enter a profile Name and Description. A Description is not required. The Access Group and Entity are copied over from the selected profile.
-
To edit definition and site assignments, use the Definitions and Sites tabs. The copied profile will have the same definition and site assignments as the selected profile.
-
Click the Save button.


